How to Start a Food Blog: an Easy Beginner’s Guide
How to Start a Food Blog: an Easy Beginner’s Guide: a step-by-step tutorial shows you how to start a food blog and a few basics and tips to get going!
“You should start a food blog!” “You’d be soooo good at it!” “Have you ever thought about starting a food blog?” You might’ve heard these statements once or twice, or all the gosh darn time. You might think that they’re unrealistic and just a dream. But guess what? They’re not, and it’s not.
I started my food blog 2 years ago—actually, my blogiversary is coming up! Way before I even signed up for a domain or ever dared to dream about having my own food blog, I was incessantly and annoyingly always cooking/baking up a storm and taking photos of what I made. Erik and I would pore over the pics I took on my iPad, making sure to send just the “best” ones to my sisters and friends.
But I never thought it would turn into anything. I thought starting a food blog, and maintaining one, would be virtually impossible. I thought making a living off of food blogging was just a dream.
I’m here to tell you: it’s REAL. In less than 2 years, my beloved little ol’ blog (who I thought no one would ever care to see/visit/try the recipes on/or even knew existed) clocked in over 7 million views. In less than 2 years, I grew a following of over 60,000 on Instagram, 55,000 on Facebook and more.
More importantly, I made a living off of this… dream. 🙂 And I’m so glad I took the leap.
If you don’t think you can, if you don’t think it’s “realistic”: I’m here to tell you, it is. All you have to do is start.
All you have to do is try.
Here are the first steps to turning your dream into a reality…
How to Start a Food Blog Steps: a Beginner’s Guide to Starting a Food Blog
All the basics you need to know about starting a food blog, including tips and hints!
In this tutorial, I’ll go over the step-by-step process on how to set up a food blog. I’ll be focusing on using Bluehost, a very popular web hosting company. I recommend Bluehost because it’s widely-used, super affordable, and the industry-standard for starting up a blog.
Step One
Pick a Name for Your Blog & Domain
Now, for the fun part! Pick a name for your blog—this will be your domain name. Pick a name that has meaning to you, is positive and memorable. Then, use a domain name search tool to see if it’s available. Here’s a free, handy one from Bluehost: Domain Availability search engine.
Helpful Hint: Pick a name that isn’t similar to anyone else’s. You don’t want to run the risk of being confused for another blog. After running a quick search using Bluehost’s easy domain availability tool, check social media, like Instagram and Facebook, to make sure the handle you want isn’t already taken.
Step Two
Pick a Web Host
Now it’s time to pick a web host! The web host is where your blog will live. It’s space on a server—the server will “host” your site for any and all visitors that come by via the grand internet. Below, I’ll go through the steps for signing up for a web host using Bluehost.
1. Start here: Bluehost. Click on the green “get started now” button. From here on out, Bluehost will guide you through super easy steps.
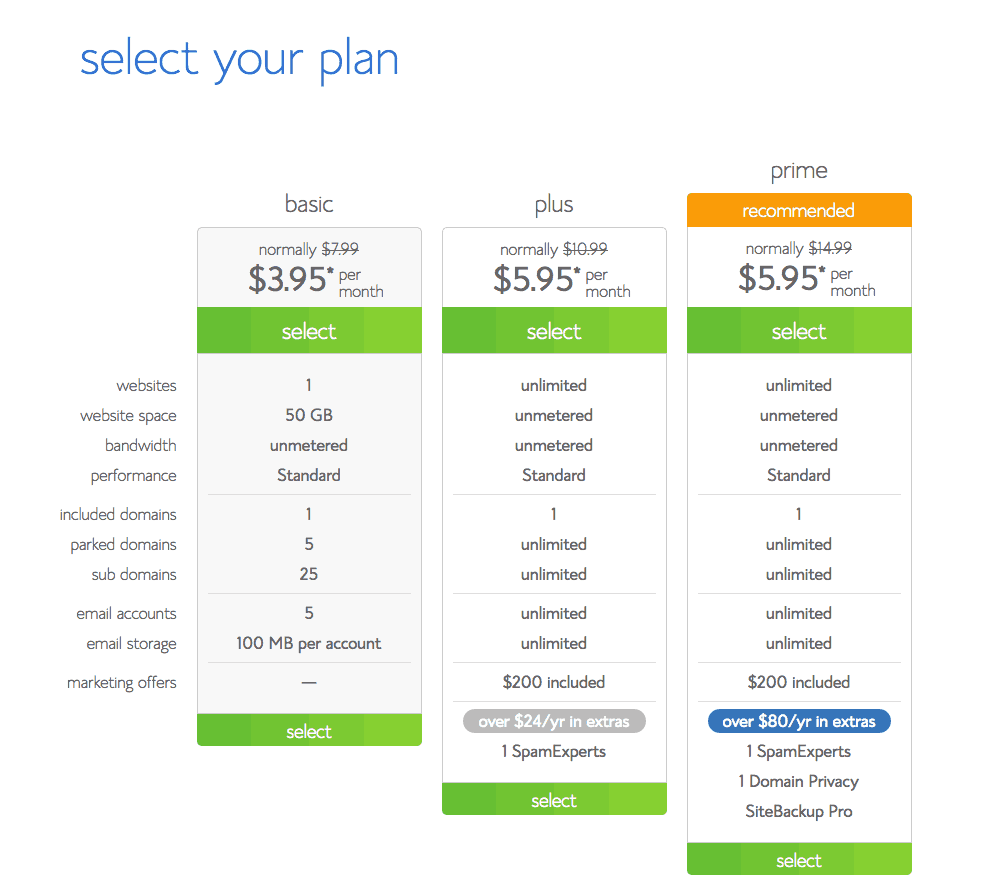
2. Pick a plan
As you can see, there are a number of affordable plans available, starting at $3.95 a month. Cheaper than a cup of coffee! (Yes, coffee is ridic nowadays.) The middle ground plans go for $5.95 a month and come with a bunch of extras. The choice is up to you!
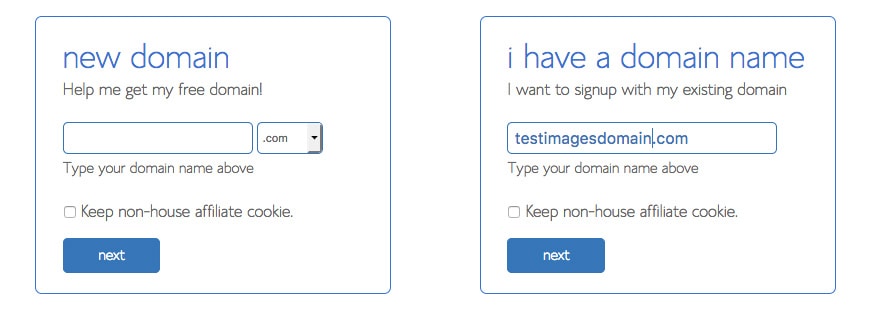
3. Check your domain or transfer an existing one!
If you haven’t yet, search your desired domain name. Bluehost will guide you through this process. It’s free and super quick!
4. Register your domain for free
Once you’ve confirmed that your desired domain/blog name is available, it’s time to register it. (Quick, before someone else snatches it up! J/k… but not really.) 😉
Follow the guided steps on Bluehost and complete registration. 🙂
CONGRATS!! You have your very own domain now. How does it feel? Good, right? Make that… really good! Onward and upward!
Step Three
Install WordPress
Now it’s time to install WordPress. WordPress is a content management system. Okay, that doesn’t mean much. In human speak, it’s a blogging software that provides an easy interface to help you blog! They help format everything in a visual way that’s easy to understand—so you don’t have to code everything by hand (nightmare!!).
Helpful Hint: The great thing about installing WordPress is that it’s 1-click on Bluehost–meaning you literally just have to click once to get it installed. Woohoo!
Step Four
Pick a Theme
Now, you can do one of two things:
- Choose a free theme and get started!
- Pay for a theme and look professional ASAP.
I’m not gonna lie, when I started, I seriously considered using a free theme to save a few bucks. I even scoured the internet looking for ways to customize the heck out of said free themes to “disguise” them from looking, well, free. But that turned out to be way more work than was worth saving those few extra bucks.
Here’s what I signed up for, and what I continue to use to this day (as of publish date):
- Genesis Framework by StudioPress (parent theme)
- Foodie Pro (child theme)
Why’d I pay for both Genesis and Foodie Pro? Simply put: they made my life aka food blogging way easier and better looking. If you’re sitting there like, what the heck is a Genesis Framework? And why Foodie Pro? Let me explain.
The Genesis Framework is a parent theme. It’s like the frame of your house—you don’t see it, but its solid frame is crucial to your home’s stability. Genesis is a clean, simple framework that’s used by the biggest food blogs in the world. Its search-engine-optimized infrastructure allows you to have the solid foundation to create a successful food blog.
Foodie Pro is the child theme/aka the walls, paint and pretty flooring that you put on top of the Genesis Framework. I picked Foodie Pro because of its sleek, clean and modern design. I knew a lot of people used it, and thus, I’d easily be able to find tutorials on how to customize it. I also loved how it looked straight out of the proverbial box.
Helpful Hint: Pick a theme that looks 95% like what you already want. It is a huge headache to customize themes, so you want to pick something that’s pretty much ready to go!
Step Five
Install Plugins
Here’s another fun part! If the parent theme is a house’s frame, and the child theme is the walls, paint and flooring, then plugins are the fixtures and lighting. Quick: who’s craving some HGTV right now? Plugins are easy to install and crucial to adding fun and useful touches to your blog. Here are a few super helpful ones:
JetPack: an entire suite of useful tools custom-made specifically for WordPress. Pretty much everyone uses this!
Spam Comments Filter: automatically filters out spam comments, so you don’t have to!
Related Posts: there are a tons of related post-type plugins, and I’ve yet to find one that I love. But here’s a good one to start with. It displays related blogposts at the bottom of a post, steering your readers to related content.
Comment Reply Notification: this nifty plugin sends an email every time you respond to a reader comment. This lets them know that you’ve responded, and brings them back to your blog!
Step Six
Publish!
Now you’re ready to go! Write your first blogpost, write your first recipe, and take your first food pics for your brand new food blog. Set a schedule and stick to it. Don’t worry too much about customizing your theme to perfection, or finding just the right plugin. Focus on publishing first, and doing the fancy extra stuff later. Good luck!
Closing Thoughts
Don’t be afraid to just try. I was raised in a household where failure was not an option. Anything less than astounding success was not an option. But I learned through love and perseverance that trying is all that matters. Followthrough, leaps of faith and pursuing your dreams is all that matters.
Don’t worry about what people will think, or how it will look if it doesn’t work out. Just try and see if you like it. On a daily basis, I fail at food blogging. Actually, I fail at food blogging on a second-by-second basis.
But then I GET UP and try again. There is no such thing as an end unless you want it. There are as many beginnings, fresh starts, and dreams as you want. You just have to start.
Believe in yourself. And go get ‘em!
This post contains affiliate links, which allow me to make a small commission for my referral, at no additional cost to you. Thank you for supporting Beaming Baker.
Facebook ☀︎ Pinterest ☀︎ Twitter ☀︎ Instagram


