This post may contain affiliate links. Please see our disclosure policy.
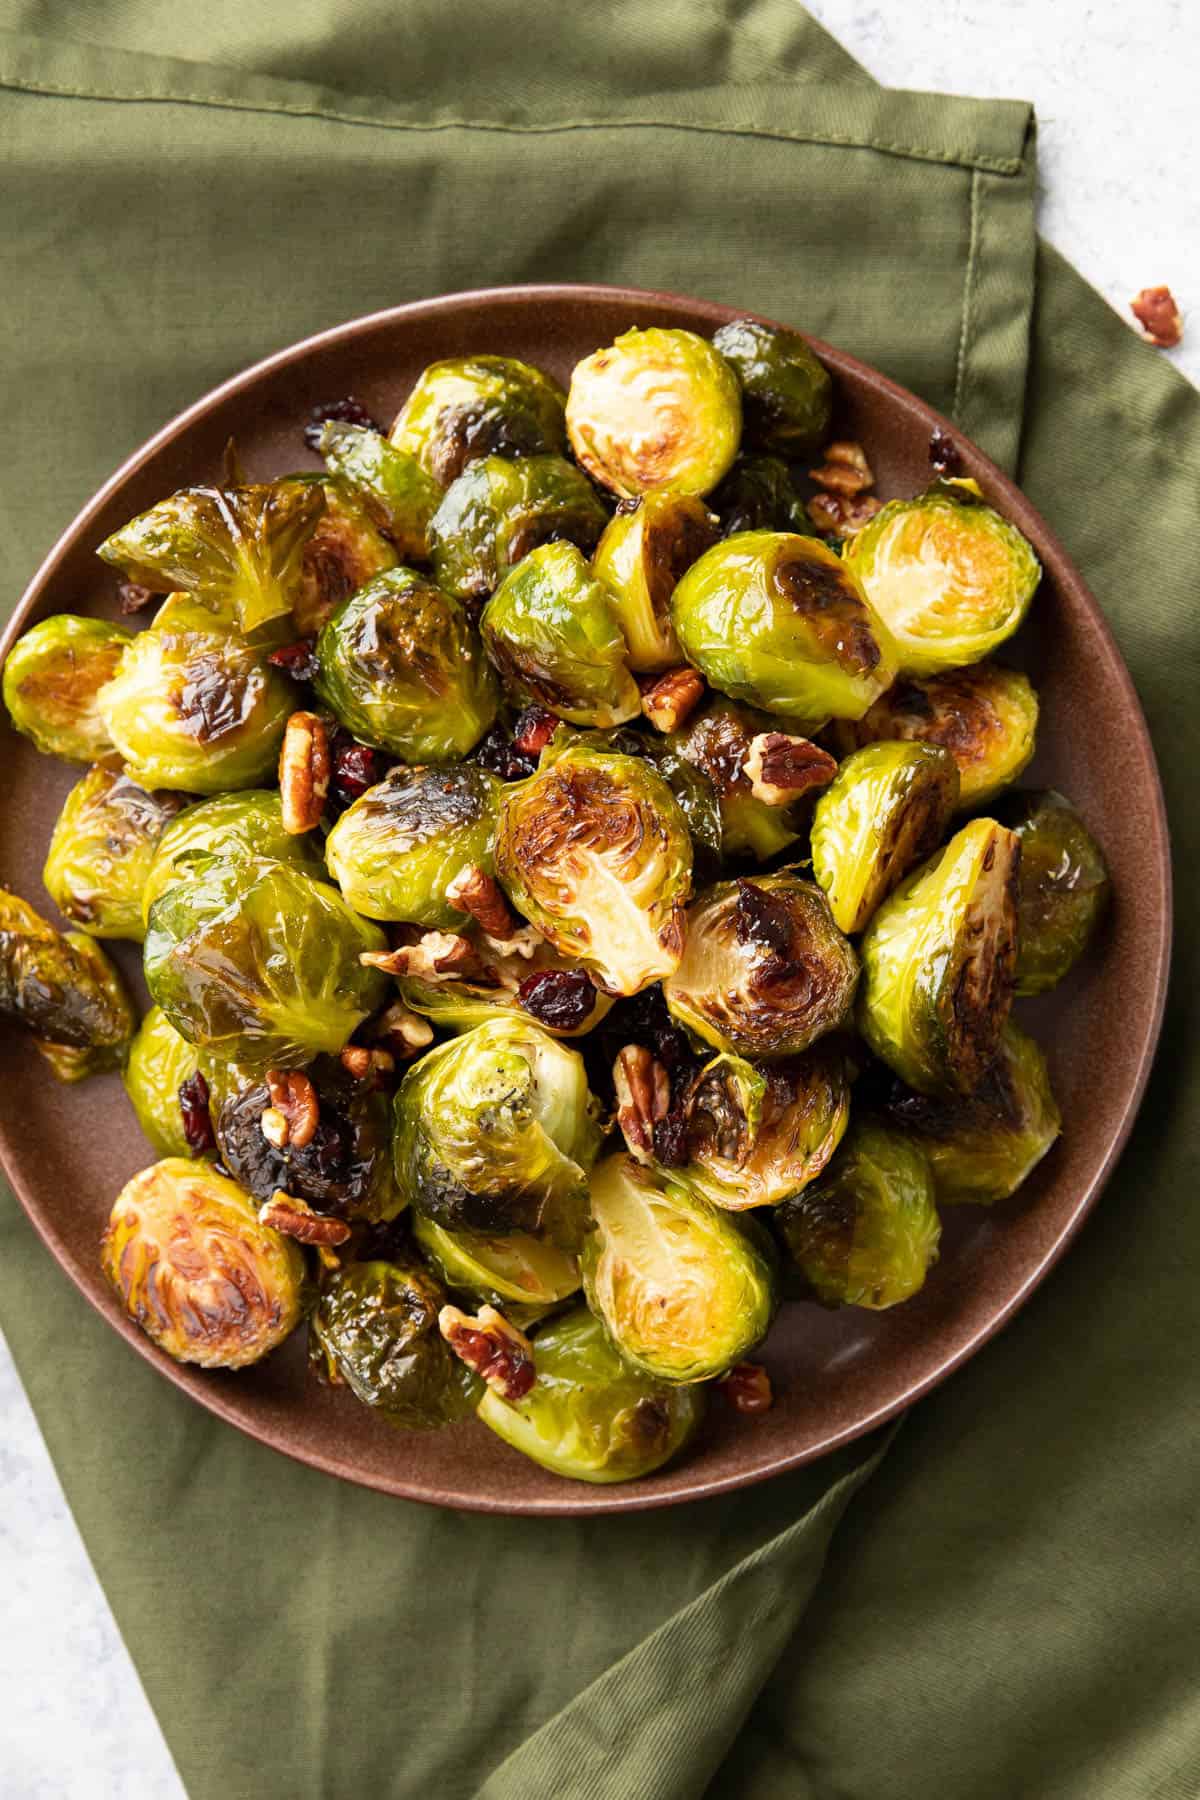
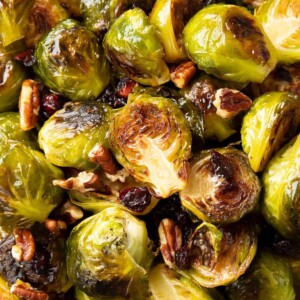
Maple Brussels Sprouts: sweet maple syrup complements tender-on-the-inside, crispy-on-the-outside Brussels sprouts while nutty pecans and tartly sweet cranberries finish off this beautiful and easy Thanksgiving side dish.

The Best Maple Brussels Sprouts
Crunchy pecans, ruby-red cranberries and pure maple syrup come together to fancy up a delicious thanksgiving side dish. The best ever Maple Brussels Sprouts recipe is so easy to make, with just 4 ingredients, you won’t believe the relaxed pace at which this recipe will come together. Let’s make this!
Only 4 Ingredients for this Maple Brussels Sprouts Recipe
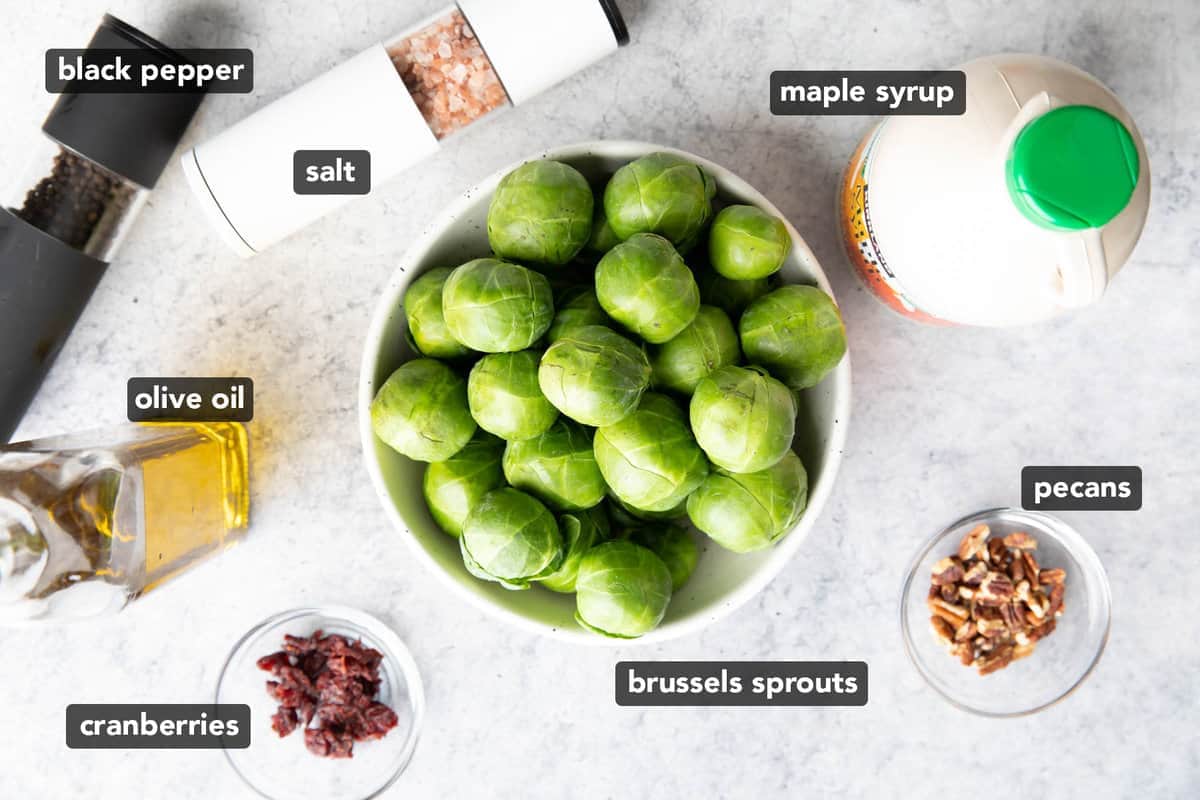
This simple and easy recipe for maple brussels sprouts calls for just 4 ingredients, not counting oil, salt, or pepper.
- Brussels sprouts
- Maple syrup
- Dried cranberries
- Pecans
How to Make Maple Brussels Sprouts
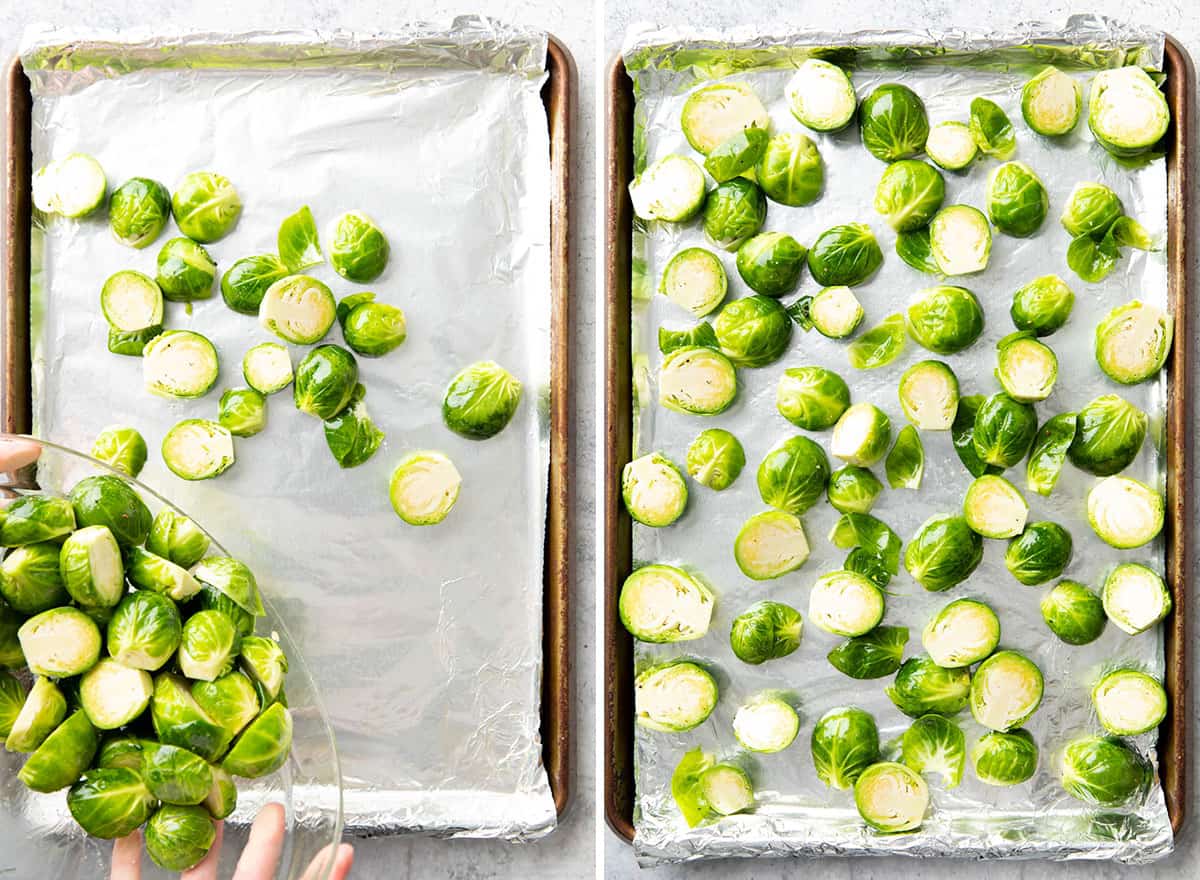
Today, we’re making maple roasted, maple glazed Brussels sprouts in the oven! To start, we’ll begin by preheating the oven to 400F. Then, lining a baking sheet with greased foil.
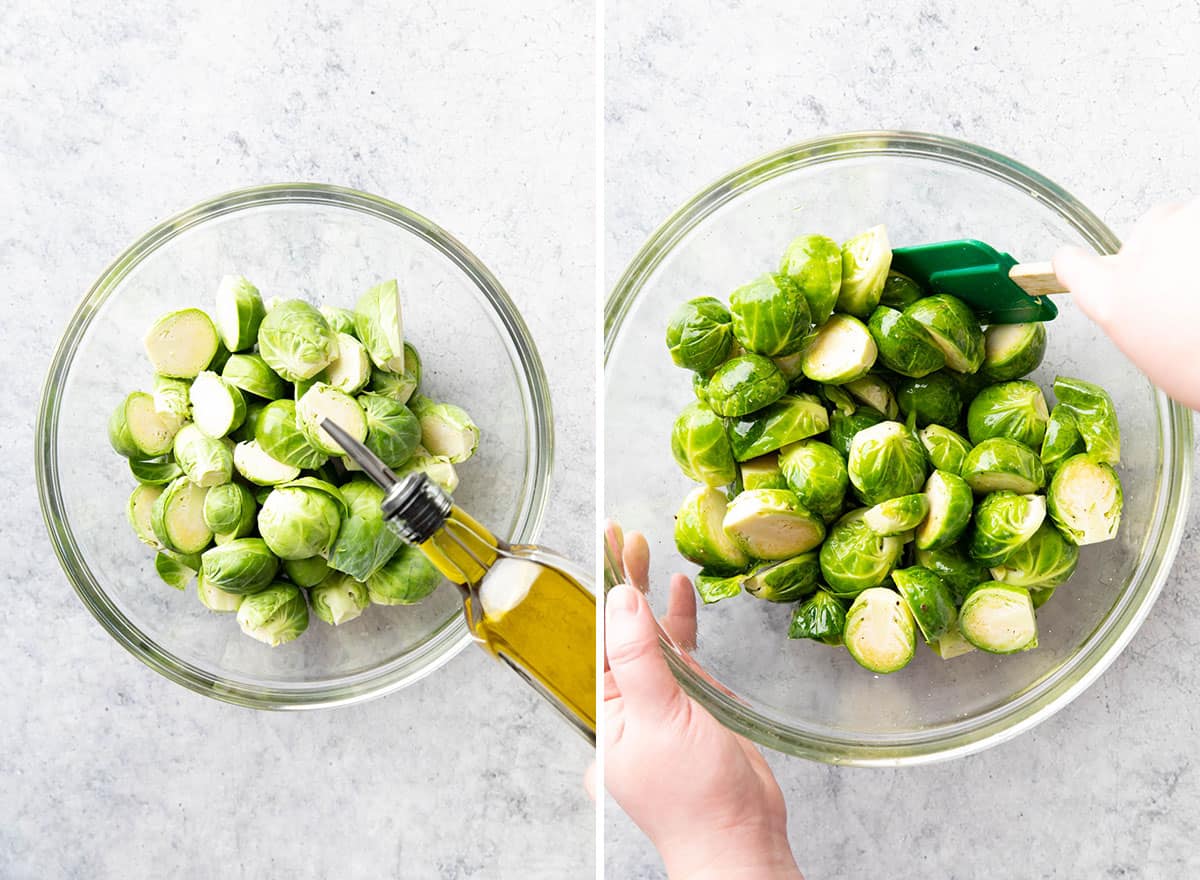
Now, wash and pat dry Brussels sprouts. Trim off the ends and slice each Brussels sprouts in half.
Next, add the Brussels sprouts to a large mixing bowl with oil, salt, and pepper. Toss to coat.
Pour the Brussels sprouts into an even layer on the prepared baking sheet. Then, remove any stray leaves to avoid burning. We’ll add these back in later.
Bake for 15 minutes, then stir and flip, and bake again for about 15 more minutes.
Remove the tray from the oven. Sprinkle in cranberries and pecans.
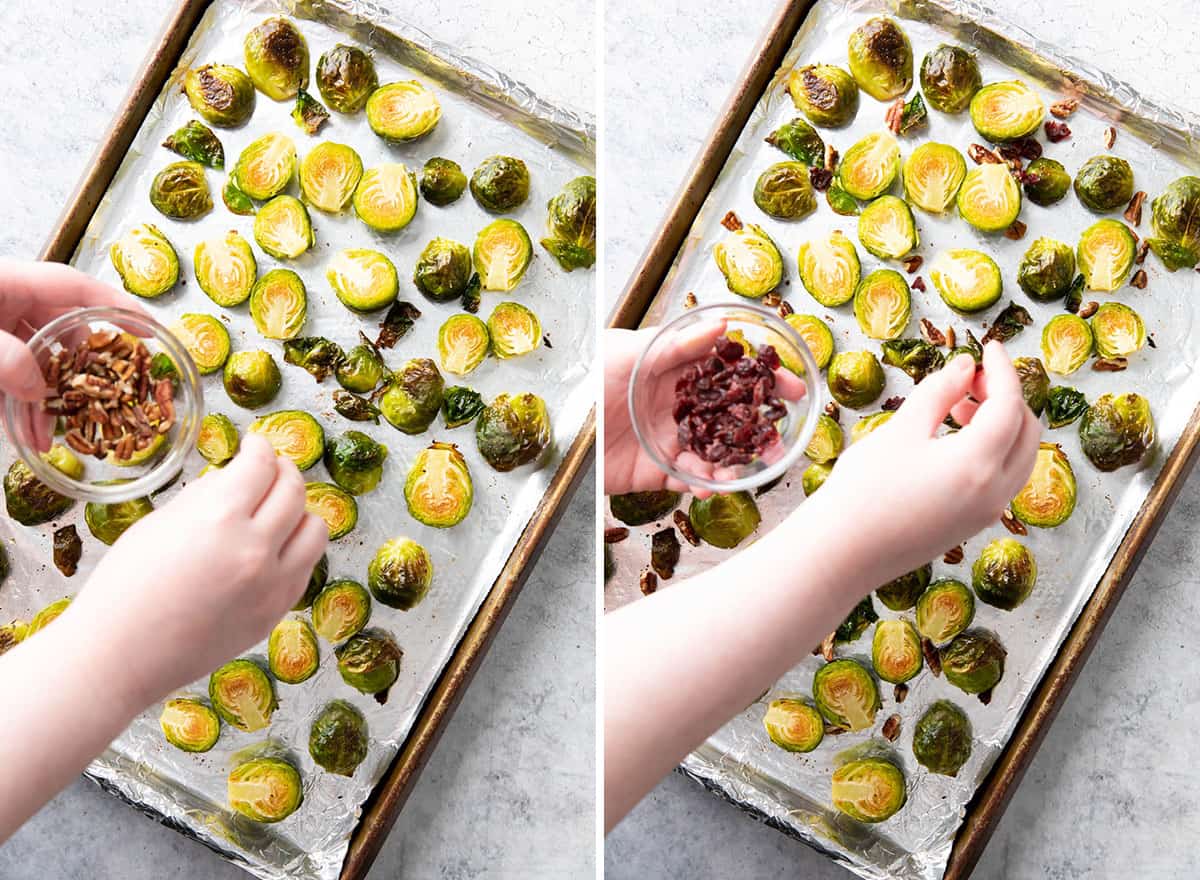
Then, drizzle cranberries, pecans, and Brussels sprouts with maple. Give it all a good stir to coat. Bake for 2-4 more minutes.
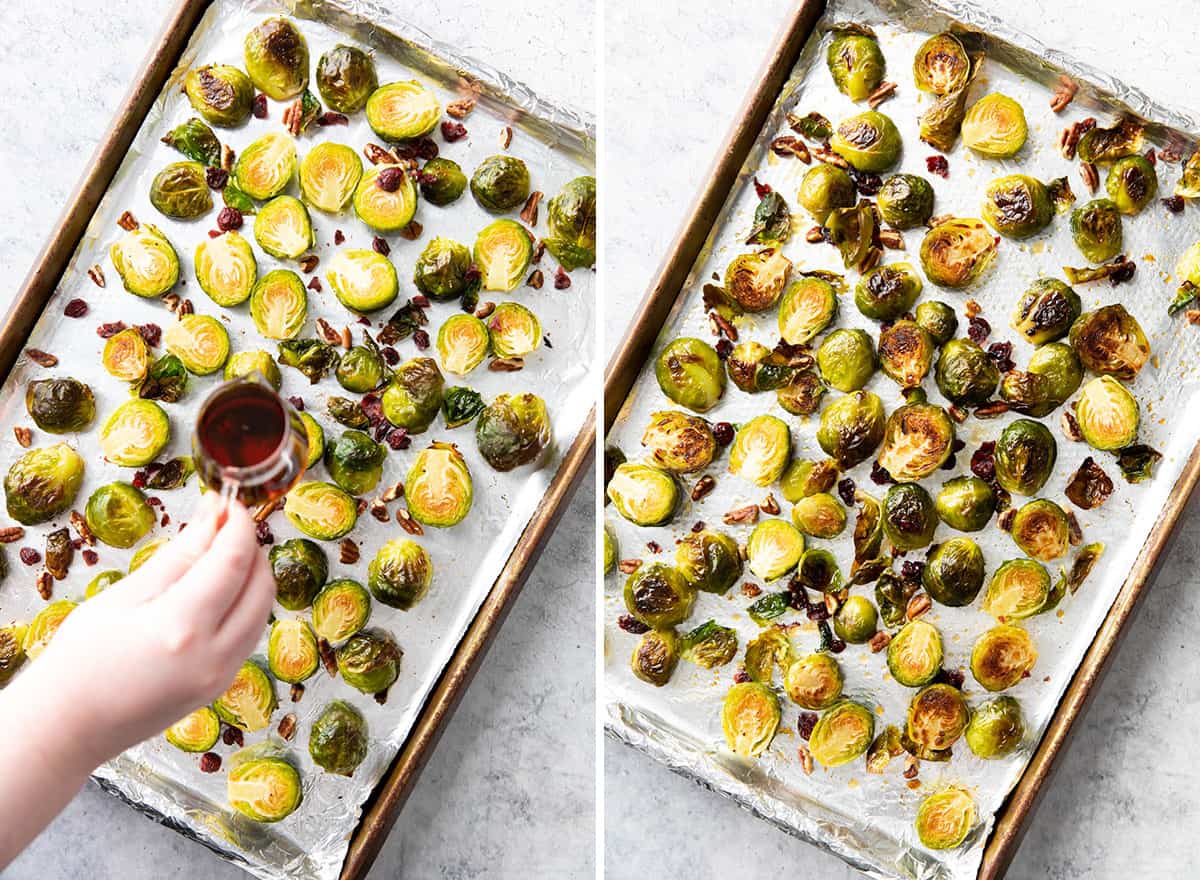
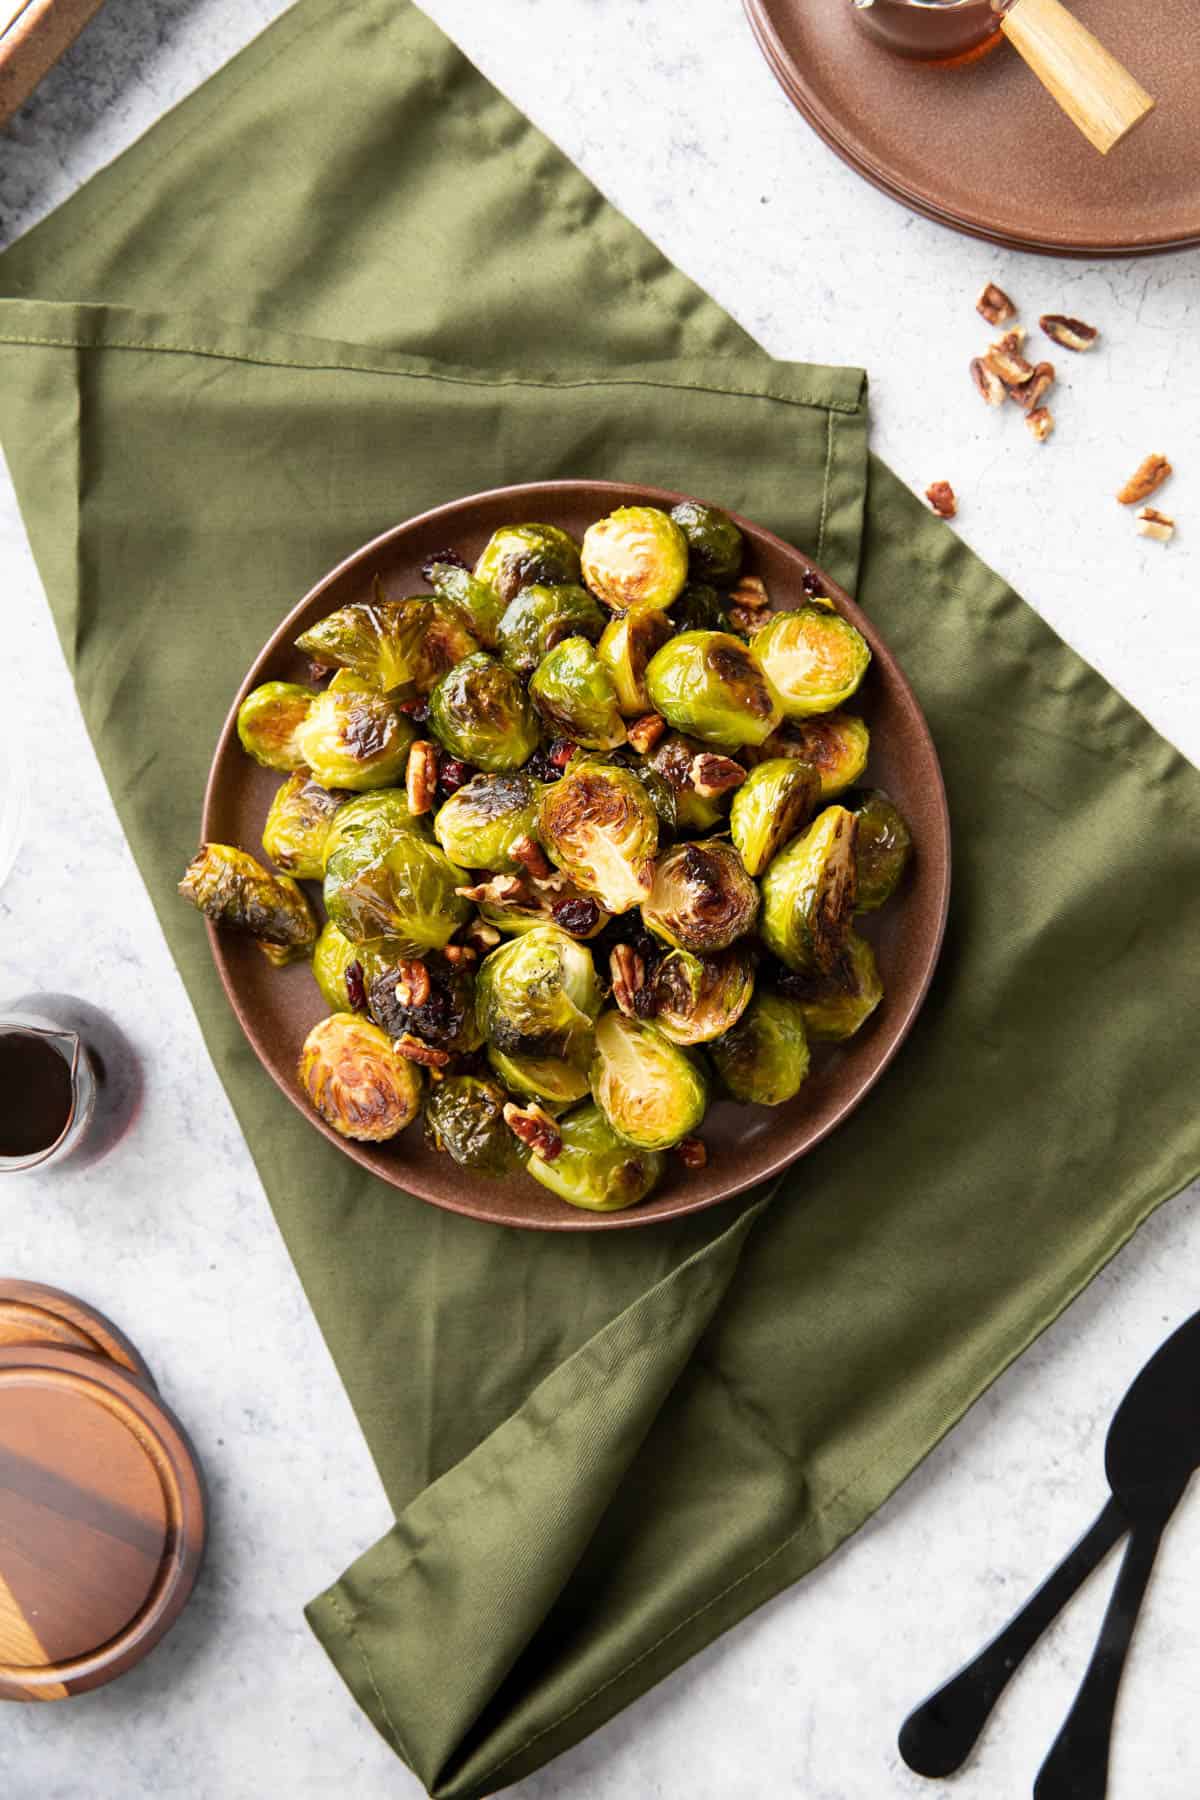
Pour into a serving dish and enjoy the best maple Brussels sprouts!
Storing Instructions for Maple Brussels Sprouts
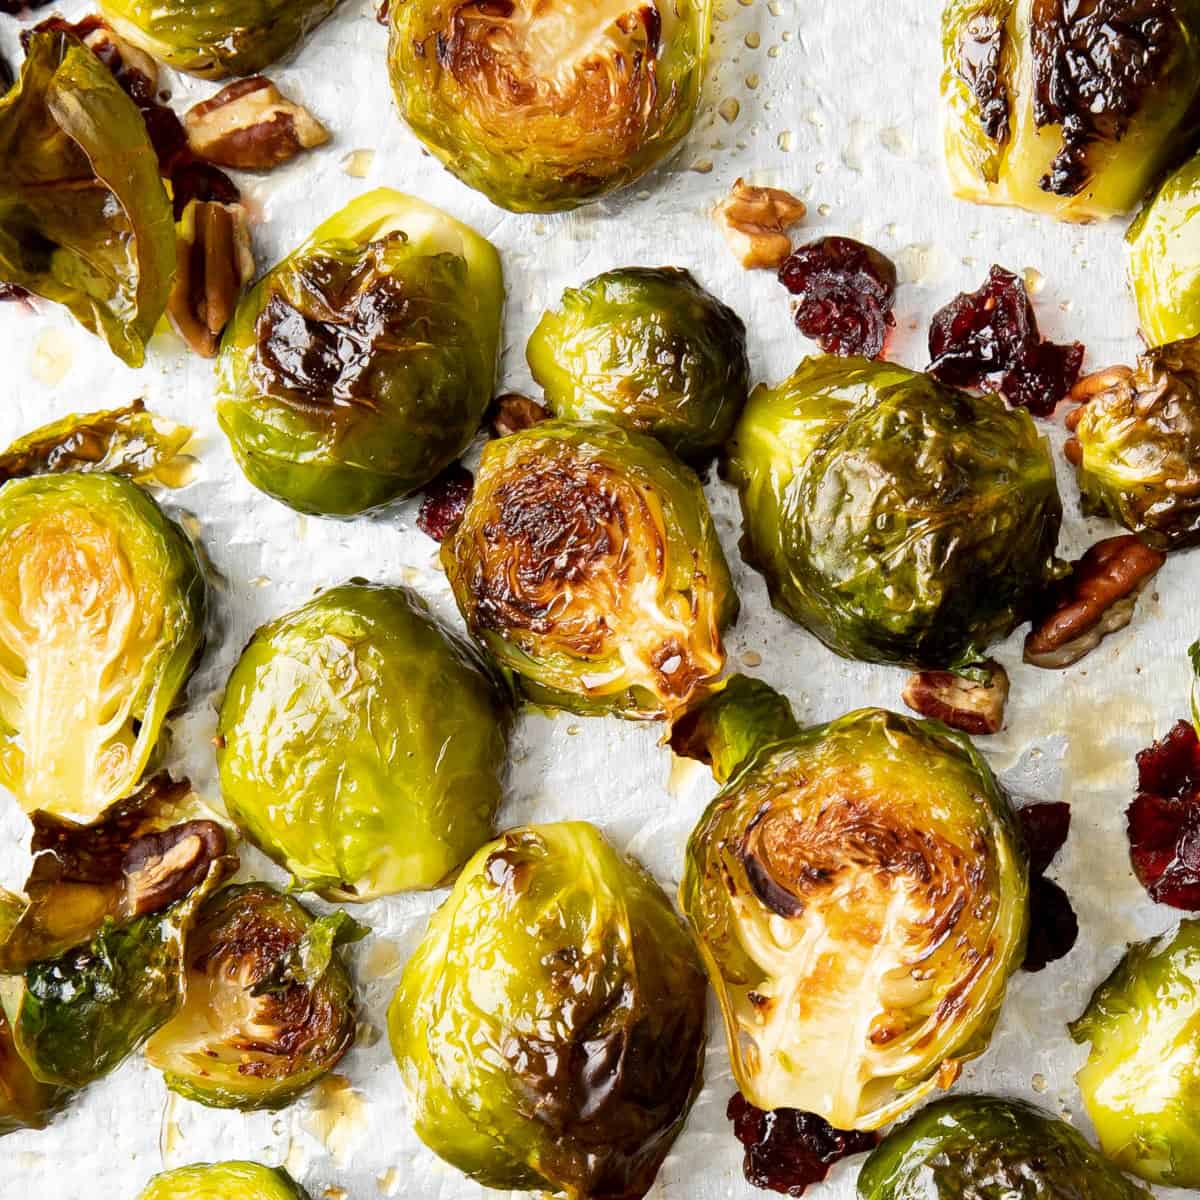
This maple Brussels sprouts side dish is best served right away. When served fresh, this dish is warm, sweetly fragrant, and boasts crisp edges with tender centers. When served hours or even days later, this crispness and fresh deliciousness is gone.
I recommend making this maple Brussels sprouts recipe in advance and keeping warm as little as possible before serving. If needed, you can store cooled Brussels sprouts in an airtight container in the refrigerator for 1-2 days. Reheat in the oven or the microwave until hot. But, the original crispness will not be there.
Suggested Toppings for Maple Brussels Sprouts
As you can see from my photos, my favorite toppings for these maple Brussels sprouts are dried cranberries and pecans. However, you can take your dish in a different direction:
- Dried cranberries + pecans (my preference)
- Dried apricots + sliced almonds
- Sesame seeds + raisins
- Keep it simple with just a drizzle of maple syrup
- A dash of paprika, cayenne, and black pepper for a sweet ‘n spicy kick
All these variations also pair perfectly with my Creamy Chicken Dijon Recipe and my Pan Seared Chicken Breast to make a wonderfully well-rounded meal.
Taste the Flavors of Fall 🍂
Tools You Need
- baking sheet
- mixing bowls
- measuring spoons
- nifty salt & pepper grinders
A Maple A Day Keeps the Doctor Away 🍁
Yeah, I’m pretty sure that’s how the saying goes. 😉 Just know that your sweet comments mean the world to me. If you try this recipe, be sure to share a pic on Instagram and tag me at @beamingbaker and #beamingbaker. I truly can’t wait to see it.
Sending you all my love and maybe even a dove, xo Demeter ❤️
🥬 📸 🍁
📸 Did you make this maple roasted brussels sprouts recipe? Take a pic and share it on Instagram with the hashtag #beamingbaker & tag @beamingbaker. I’d love to see it! 📸
Maple Brussels Sprouts
Ingredients
Maple Brussels Sprouts
- 5 cups Brussels sprouts
- 3 tablespoons olive oil or cooking oil of choice
- Salt and pepper, or to taste
- 2 tablespoon chopped pecans, optional
- 1 ½ tablespoons dried cranberries, optional
- 3 tablespoons pure maple syrup
Topping
- Drizzle of pure maple syrup
Instructions
- Preheat oven to 400°F. Line a baking sheet with foil. Lightly grease.
- Wash Brussels sprouts and pat dry with a towel. Trim off the ends, then slice Brussels sprouts in half.
- Add Brussels sprouts to a large mixing bowl. Drizzle with 3 tablespoons oil, ¼ teaspoon salt and a pinch of pepper (or to taste). Toss to coat.
- Transfer Brussels sprouts to the prepared baking sheet, making sure to spread sprouts into an even layer. Remove any stray leaves as they’ll burn if baked for the entire duration of the cook time. You’ll add these in later.
- Bake for 15 minutes.
- Stir and flip so everything is evenly baked. Add in loose leaves from earlier.
- Bake for an additional 12-16 minutes (mine took 14 minutes), being careful not to burn.
- Carefully remove the baking sheet from the oven. Optionally, add pecans and cranberries, if using. Drizzle with about 3 tablespoons maple syrup. Stir to coat every Brussels sprout.
- Return to oven and bake for 2-4 more minutes.
- Transfer to a serving dish and enjoy! Optionally, drizzle with maple syrup. Enjoy!
- ★ Last Step: If you made this recipe, leave a comment and review. It truly helps our small business keep running and it helps readers like you!
Notes
Thanksgiving Side Dishes 🍁
- Roasted Green Beans and Potatoes
- Blistered Green Beans
- Roasted Potatoes and Carrots
- Vegan Brussels Sprouts Recipe
- Maple Glazed Carrots
- Hasselback Sweet Potatoes
- In the mean time, check out Holiday Cocktail Recipes!
Wanna help grow the Beaming Baker community? ☀️
You play such an important part in the livelihood of Beaming Baker–and just know that Erik and I truly appreciate it. 🧡 If you want to help grow the BB community, you can do the following:
- 📝 Leave a comment & rating. When you try a recipe, leave a comment and star rating to let us know how you liked the recipe. It truly helps all of our readers discover which recipe works best–and keeps us going in the right direction.
- 📸 Instagram. Made a recipe? Take a photo and share it on Instagram with the tag #beamingbaker and tag us at @beamingbaker. It makes our day to see how the recipe turned out for you!
- 👭 Tell a friend. You know when you love something, you can’t help but tell others about it? If you love any of the recipes on Beaming Baker, tell a friend. 🙂 It truly helps to grow the BB community. ☀️
Facebook ☀︎ Pinterest ☀︎ Twitter ☀︎ Instagram
This post may contain affiliate links, which allow me to make a small commission for my referral, at no additional cost to you.


I love that you used maple, this sounds amazing
Thanks Tisha! I love the way maple flavors a dish. Hope you enjoy it! 🙂
I am so excited to try this! I love the flavors!
I know you’re gonna love it!
My favorite side dish! I love brussels sprouts! These look incredible!
Yes! Aren’t they the best? 😋
My first time trying this, oh my! SO good!
Yay! I’m so thrilled that you enjoyed it! 😊
The perfect flavor to go along with brussel sprouts!
Couldn’t agree more!
So glad I found this recipe! My new favorite way to cook brussels sprouts! They were so good!
Yay! I’m so glad you found it, too! 😄 Thanks for letting me know how much you enjoyed it!
MmmMMM! I can almost taste the sweetness of the maple with the bite of the Brussels sprouts. This is seriously amazing.
Thank you, Beth! IMO the maple really makes an amazing pairing with the brussels sprouts here. Glad you like it, too!
This was really good. Never thought about using maple with brussel sprouts. Will totally make it again!
I’m so glad to hear it, Nora! I know, isn’t it such a wonderful flavor combo?
Thank you for this! I’m always trying to get my kids to eat more veggies, but they’re just so darn picky (hubby too 😜). But when I made this, they actually ate it! Can’t tell you how wonderful that was. I hope you’ve got more recipes like this coming, because my fam is ready to eat them!
That’s so awesome to hear, Veronica! Oh totally with the hubby: my Erik can be prettty picky for a grown man, too… lol! 😂 We’ve got so many more yummy veggies sides coming! I can’t wait to see what you try next. 🙂